Saturday, May 29, 2010

McCall's Sewing Book

I found this book stashed somewhere in the book shelve. Well hubby did actually. It belongs to mom and has been there for ages. Can you believe it? I love it, all 300 pages of know hows and whats.

"This is a book for woman who sews and for the woman who wants to. It explores the art of sewing in all its facets to show you how to transform a piece of fabric into a lovely gown, how to change a dowdy appearance into an attractive, individual one. For just knowing how to sew is not enough. You must know how to select the right patterns for your figure, your personallity, your way of life and then fit it and finish it to give the clothes you make the smart look of good ready-to-wear ones.
This book has been planned to help you do just that. It takes you step by step through the selection of becoming and appropriate style, the choice of flattering fabric, and then into construction. Beginners will find outlined the simple contruction methods that will let the merest novice turn out a professional-looking garment. And more experienced dressmakers will welcome details on advanced construction techniques, as well as the fact-filled chapters on tailoring and home decoration.
Even the woman who seldom sew will find helpful the information on how to choose the most becoming styles, the instructions for mending and remodelling, the wealth of data on selection and care of fabrics valuable, not only for home dressmaking, but in choosing ready-made clothes as well.
Sewing can be fun, and easy to do if you take it one detail at a time. You can make it a pleasant, satisfying hobby with the added and long-lasting enjoyment of being able to wear the results of your creativity with pride.

Paul Hamlyn for
McCall's SEWING in colour"


Wednesday, May 26, 2010

Time

I wish I had more time to sew....
To make dresses for myself and Nia mainly...
Been busy at the moment...
I'm currently off for an outstation trip again. For 3 days this time.
Can't wait to come home, sleep, relax and start purring on my machine again.

At the moment just sewing blog hopping in my hotel room..alone.

Saturday, May 22, 2010

Purple Project

I bought this fabric cheap, about RM4.50 per meter to try out projects. In case disaster happens I won't feel bad throwing the whole project into the bin. I was underestimating myself. I'm good at this. Yes, yes! So far all projects turn out OK except of course I have to practice to refine my sewing techniques so that the finishing looks a bit more polished. Back to the fabric, cheap fabric comes with blah quality. Its cotton lining by the way. Usually we use this to line the insides of clothes. Not used to being in the limelight I guess this cloth tends to shy away and not perform. The end results is that the binding becomes kremekmot (ie. crumpled) and the decorative stitch I wanted to 'decorate' the plain cloth pulled the fabric thread that it becomes a bigger kremekmot. Blame the cloth, but probably the thread tension too got something to do with this. (Woow..look at me talking the alien sewing language). Below is the project. I decide to stop just there. It has a dress outlook but I wouldn't buy this in store with the stitch and finishing quality.

Almost finished disaster

Obvious kremekmot on the neck binding

So I decided to use the remaining cloth for a simple bag project. I found a stitch which I wanted to try taken from this blog and link to this blog Crafthours.
I thought why not make it into a small bag and taraaa! I gave it to Dina for her to play dress up.

The stitch

Taken from my other blog.

Wednesday, May 12, 2010

I want one too..

As I mentioned in my last post, I made this for a friend. I really like it. Infact, everyone who has seen it thinks its really nice. Thanks all for making my day. A flannel blanket for a baby girl. Hopefully the baby will want to use this. Nia hates blankets. She'll kick and squirm in her sleep until blanket is off her body.

It's really easy to make. I cut the 2 fabric about 1 metre by 1 metre. Sew them together from the wrong sides. Leave 5 inches to turn inside out and sew along the sides about 1/8" seam allowance once this is done. You've made yourself a blanket. I used the rotary cutter, cutting pad and the ruler for the first time after buying it 2 months ago.


Both sides are nice.

I added the baby's initial. Cut the alphabet and heart shape using white and pink flannel fabric.

And sew the applique stitch around it. This is done before the two layers are sewn together.

Sunday, May 9, 2010

Flannel and covers

Mother's Day was not so much of celebration...no cakes no gifts no candlelight...Just precious time with family...just the way I like it.
The house was a full house on Mother's Day, mom, siblings, nephews, nieces and cousin.


Being at home with screaming children, loud conversation by the adults trying to overpower the screaming kids and TV volume at level 30 doesn't help either. You can imagine the havoc in my little house. Happy havoc non the less but above all I managed to finish 2 projects on the same day with cooking, feeding and bathing a child etc. in between. Multi tasking in all its glory!


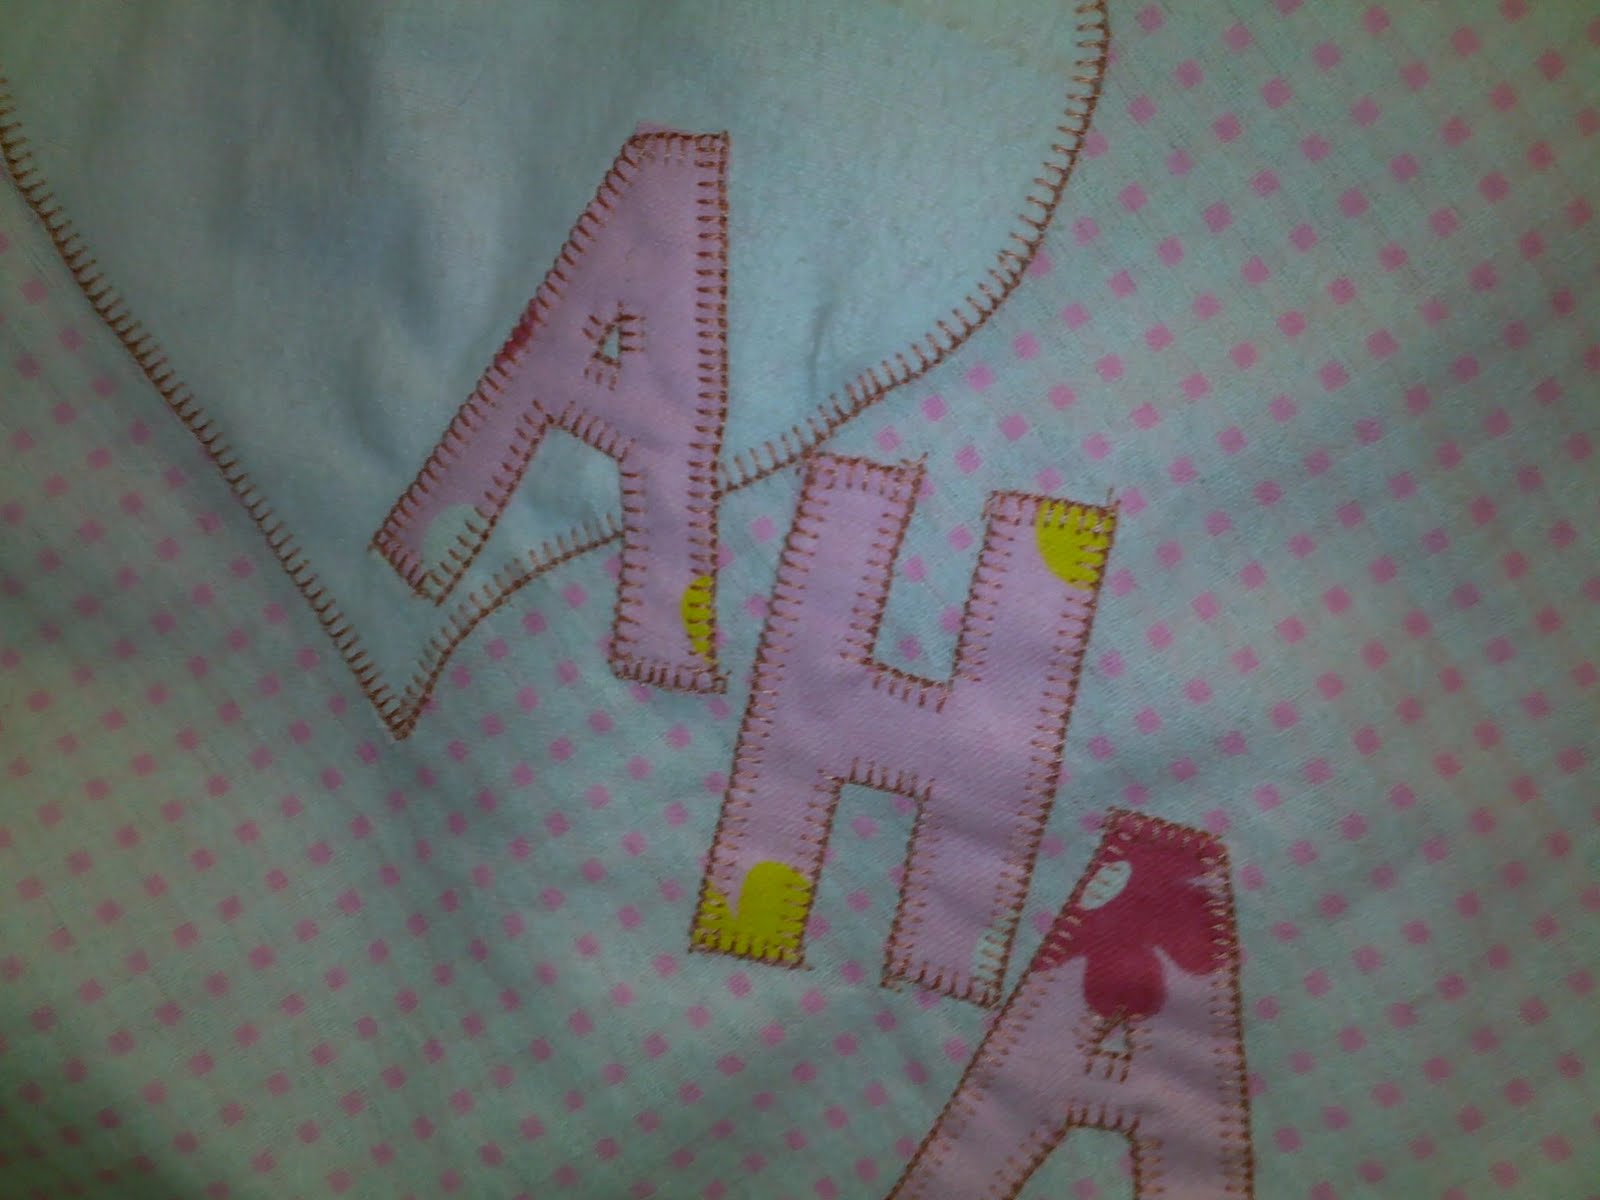
A sneak peak of a flannel blanket I made for a friend who just gave birth to a little girl. I'll post a better picture later. It was at night and the lighting were not too good. I wanted to show this anyhow because this is my first applique project. Not bad?

Another project for a friend who wants me to make a batch of breastfeeding covers. Before starting I thought of making the pattern and use my own fabric first. Just too see how it'll come out. It came out quite well. I tried using this while feeding Nia. She didn't like it. She kept pulling the fabric away. She's just not used to it. I guess you have to start them young. Too late for Nia. Or she prefers the Mama to bare her chest. Seriously I used to be a shy person before Nia came. Oh well....that changed a bit.

Instead of rings, my friend wanted the adjustable buttons.

Wednesday, May 5, 2010

My first project ever


This was my first ever project.

Since I have no knowledge or experience in sewing, I figured the best project to start with was to follow the step by step guide in Anna Maria Horner's Seams To Me book. It had the beginner, intermediate and difficult projects. Being ambitious me, I choose the Prairie Blause to start my first ever project. No, not the basic straight stitch projects (not challenging enough!) but the ones with bias, darts (until today I don't know whether there's actually darts in the pattern but I did some in places where I thought it should be), use of elastic bands and complicated steps for a zero or nothing sewing technique person.

I have to say the results are quite impressive and for that, I'm proud of myself. Doing this project makes me believe that I can actually sew and do simple projects. It's not that difficult but it's comes with its own unique challenges and takes a lot of patience to make things right. NOW, I can start with simple projects. We'll see.....

I went through Oh ooo, OMG, Huh? and How did that happen? moments ...but I managed to set things right
  • I altered the pattern to suit Nia's size. A big job for a 1st timer. Oh ooo, the shoulders are 1 inch shorter than the body.....amend amend

  • Stitch Stitch...OMG the left shoulder is attached to the right shoulder...rip rip...How did that happen? Stitch stitch..

  • Huh? Front attached to the back..since when? pppfff.....Rip Rip Stitch stitch...

  • And more blunders, which probably cost me 5 metres worth of thread wasted. No joke!

  • Thank God for seam ripper
P/S : Sanitary sewer : a system of pipes used to transport human waste; Storm drain, a collection and transportation system for storm water;

Tuesday, May 4, 2010

My machine

I have not reviewed my machines before. I’m doing this now because I am now feeling grateful for the sewing machine I purchased 4 months ago. I just love it and I have made the right decision to buy this. It makes my sewing experience so easy. It works wonderfully.

I am using a Brother Inovis Model NV30. It has 70 types of stitches to choose from. Straight, button holes and decorative stitch.
But the best part about this machine, it has an automatic needle threading. I just loop the thread up to step 7 and press the lever, automatically the thread is in. No need to strain my eyes to thread the needle. I love it!
Press lever and the thread is in.

I had an agonizing experience to thread this manually. It was no simple task for a newbie like me. I had this machine for some time now kept in a box. My brother gave it to me. He purchased it at a promotional price. Buy a sewing machine and get an overlock machine free. He has not used this for ages. It has no significant brand but it’s a mean little machine. It is so mean that its model in the manual is different from the machine model. Leave to China to make exact copy of anything and everything under the sun. I decided to use it last week, just because. Another reason is, my baby NV30 comes with overlock stitches and foot. How convenient! I still need to familiarize myself using this little mean machine. The stitches are a bit loose at the moment. Finding ways to tighten it.
A small soul

with mean internal....

Monday, May 3, 2010

Projects to come

Last weekend mom wanted to go to a local fabric store, Nagoya which was on sale. This was very rare, mom asking me out for shopping because she almost never does. Fabric? On sale? Of course mom. We went to the one at Jalan TAR. On the way there I passed by a little secluded shop. They had mannequin, stuff and my jaw dropped......a dressform......OMG OMG! Incidentally the cars were not moving. I wound down the window and shouted at the sales lady. "Patung tu boleh cucuk pin untuk buat baju?" "Boleh." "Berapa?" "RM100". Cheap aint it? This will be my next thing on the list. I didn't plan to shop but how can I not? The damages was done.


I plan to make these for Nia, polka dots and gingham. Love it!
Flannel fabrics for two of my friends who are giving birth this year. I have not thought about what to do with it yet.
A little gift for me. Another fabric and lining for baju kurung.
This is a third one. Satu pun belum buat lagi.
I've not done baju kurung before but I have big dreams, as usual. Haha

Mom wanted me to buy those brown paper and tracing paper for pattern making. Before this, I've been using A4 paper and newspaper je. Proper la sikit.

And these? These are sample fabric that was sold at the SS2 fabric store. I just can't keep my hand to myself.

My first ever pattern. The other patterns are mom's so it does not count. I am going to make day shirt and dress. Yeay! And the fabric below the packaging. Owh you don't want to know.

I have to post this one here as well because I love it too much. I have updated this in my other blog. It was a present from hubby for my birthday mid April. No wonder you see all those fabrics. I treated myself well on this year's birthday.

NOTE : I am going to update old posts on sewing from my other blog from time to time. So you'll older projects which was done earlier. Nothing WOW! Just sharing.

Tiered dress

I bought the fabric material for quite sometime. It was on sale at a fabric store in Ampang Point. After looking around and figuring what dress design I should make, I decided that tiered dress would be interesting. I guess after a few dresses, you kind of able to just decide what pattern and come up with a design, cut and sew away. My challenge at the moment is to make a perfect fit for a tiny body or for any body for that matter. Ok if I have measured why would I have this problem right? Exactly. My problem is I am too lazy to measure. Boleh? I end up having to alter all the time. Is this normal? I don't know, I just think that after finishing a dress, one should be able to wear it immediately. A person should never have to endure ripping off the thread and resew the dress after a painstaking task of putting them together the first time. It is just not fun!! Oh well...I am not an expert that's why. I have another problem. I always want to sew things fast and get it done and overwith ASAP! This is a major problem that leads to a major disaster. I'll go into that in my next post, a whole subject by itself.

Back to the dress, I made this with care but somehow I cut the fabric too wide. Little Nia has not grown horizontally ever. Why did I do that? I have no idea. Easy peasy...what I did was just cut 1"at the side from below the armpit and go down to 2" to the hem of the skirt into the seam allowance. It turned out nice. Just waiting for the nice ocassion to wear.
Front

Back